Connect WhatsApp Business
in 5 simple phases
A step-by-step walkthrough for non-technical business owners — from creating your Meta account to sending your first WhatsApp message. Roughly 30 minutes of active work, plus background waiting.
MessageBhejo is a Meta-approved Tech Provider for the WhatsApp Business Platform.
What "Tech Provider" means for you
Under Meta's Tech Provider model, your WhatsApp Business Account is registered in your name with Meta — we provide the software around it. That means:
- You own your WABA, your phone number, and your message history.
- You pay Meta directly for messages (not through us). We don't add a markup on Meta charges.
- You can switch software providers later — nothing locks you in.
- You complete a few setup steps directly with Meta. This guide covers all of them.
What you need before you start
Gather these in advance — it makes the whole flow take 30 minutes instead of two days.
See the full setup checklist — available in English & हिंदी
A Facebook account
An account that manages (or will manage) your business. Enable two-factor authentication on it.
A phone number for WhatsApp
Not currently registered on WhatsApp. Must receive SMS or a voice call. With country code, e.g. +91 9876543210.
Your business details
Legal name, address, website, business email (use your domain, not Gmail), category, short description.
Business documents
Registration certificate + a recent utility bill or bank statement (under 1 year old). Names must match exactly.
A display name idea
What customers will see in WhatsApp. Must match your business — most rejections happen here. Rules below.
A credit/debit card
Used by Meta to bill your message charges. You'll add it after the embedded signup popup.
Set up your Facebook account
The Facebook account that will manage your WhatsApp Business.
Make sure you have a Facebook personal account
Go to facebook.com and either log in or create an account. You'll use this account in Phase 3 to authorise the WhatsApp connection.
Tip: Use an email you control long-term. This account becomes the "key" to your WhatsApp Business — losing it later is a serious problem. We strongly recommend enabling two-factor authentication on it (Settings → Security and Login).
Create your MessageBhejo account
Five quick clicks to get into the dashboard.
Sign up
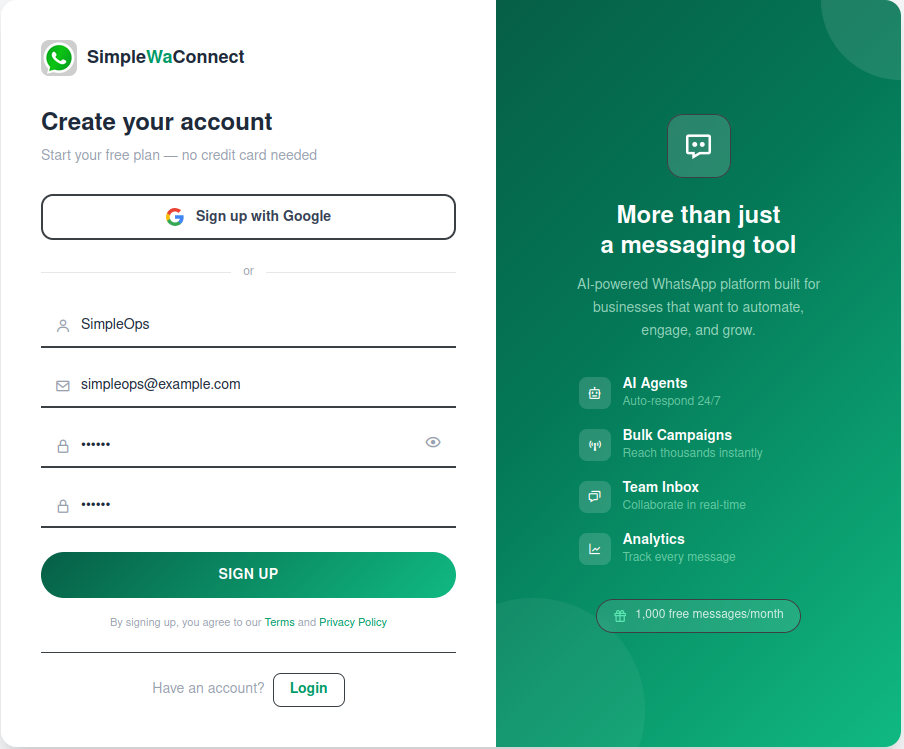
Open the MessageBhejo signup page, enter your email and a strong password, then click Sign up.
You can also sign up with Google if you prefer — that skips the email confirmation step.
Confirm your email
Check your inbox for a confirmation email and click Confirm my account. (Skip if you signed up with Google.)
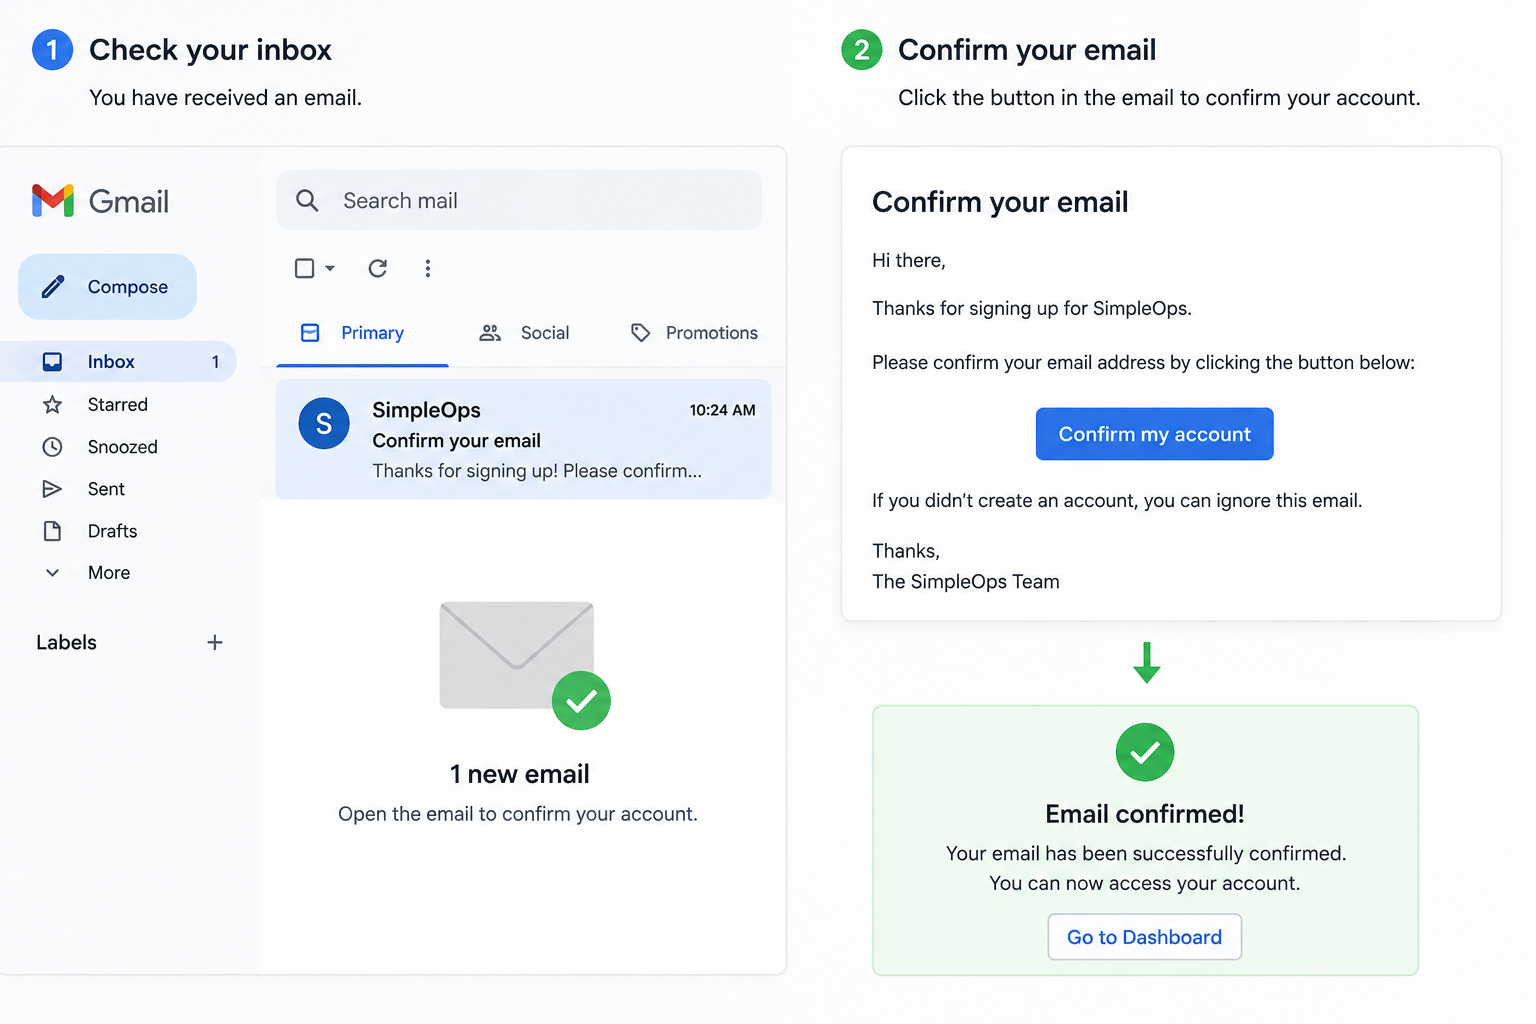
No email after 2 minutes? Check your spam folder, or click Resend confirmation on the login page.
Log in
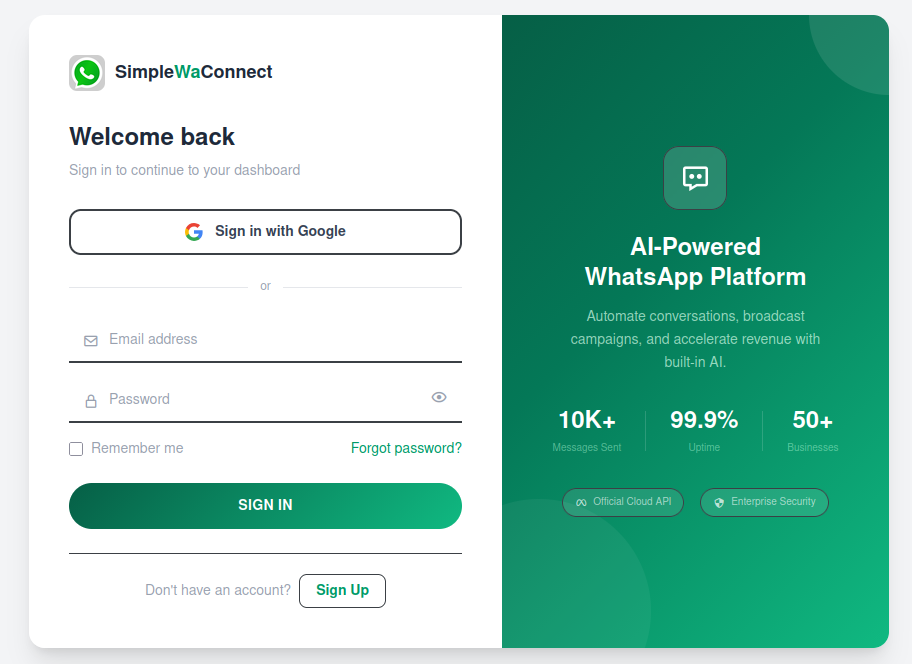
Log in with your email and password. You'll land on the Dashboard, where you'll see a banner inviting you to connect WhatsApp Business.
Connect WhatsApp through Embedded Signup
One Meta-hosted popup that links your WhatsApp Business Account to MessageBhejo.
Have ready before you start: your phone (the number you'll register), your business website URL, and the Facebook login from Phase 1. The popup takes about 10 minutes.
Open the Connect page from your dashboard
After you log in you land on your dashboard. At the top you'll see a Connect WhatsApp banner — click it.

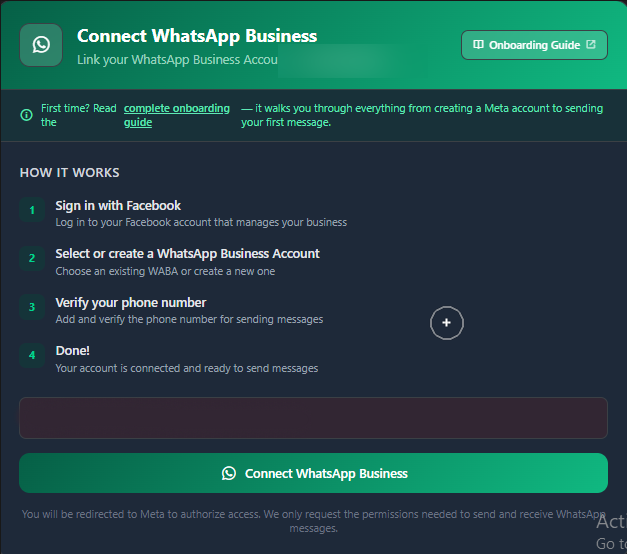
You'll land on the connect page, which shows a 4-step preview of what's about to happen.
Start the Meta popup
Click the green Connect WhatsApp Business button. A popup window from Meta opens with a short intro — click Continue.
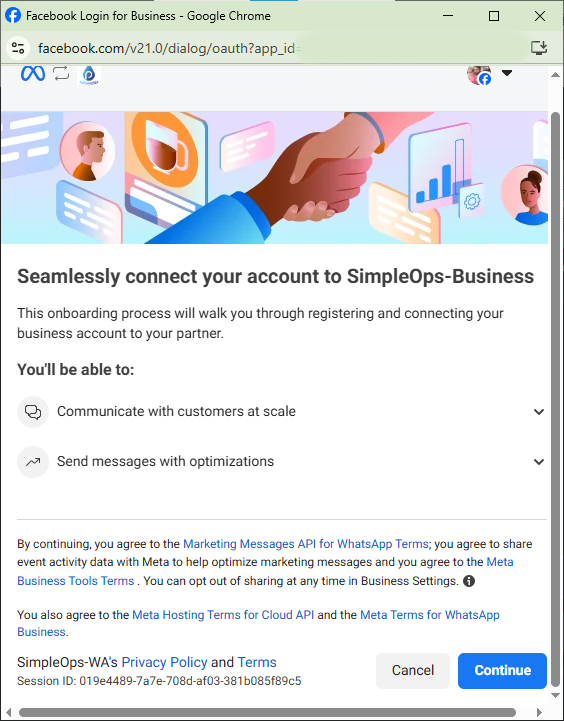
Important: log in with the Facebook account that is (or will be) the owner/admin of your business. An employee account with limited permissions will be rejected.
Create a Business portfolio
The popup asks which business assets to share. Open the first field, Business portfolio, and select Create a Business portfolio.
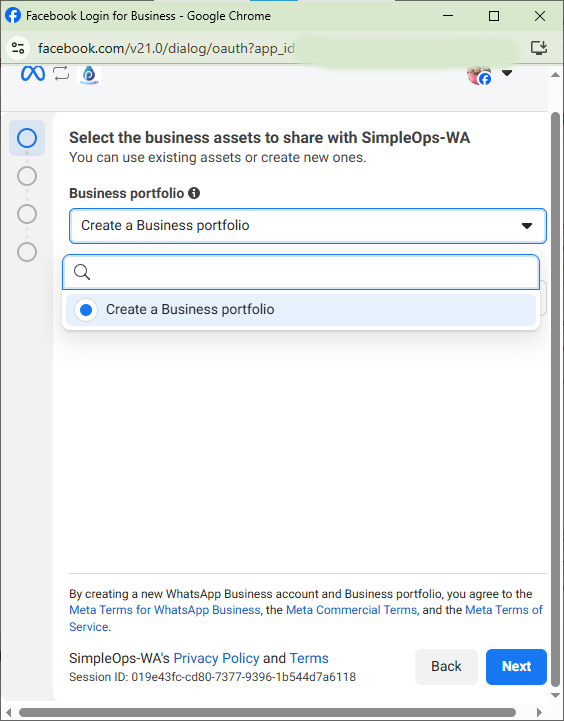
Create a WhatsApp Business Account
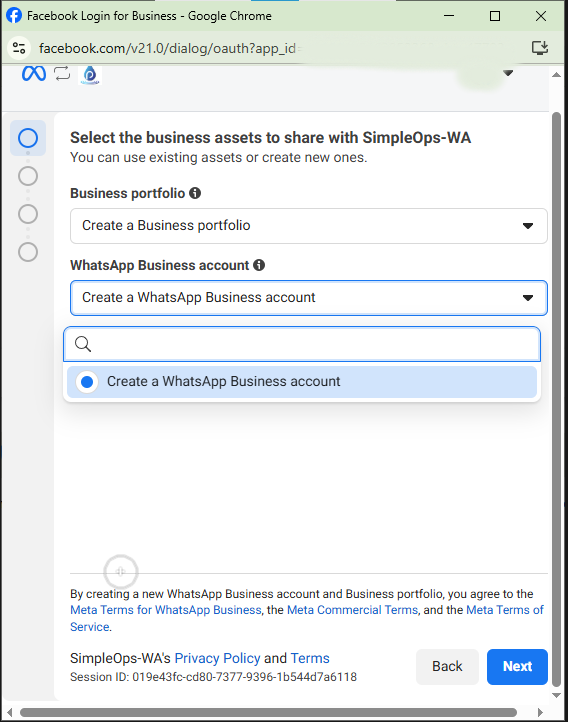
Now open the second field, WhatsApp Business account, and select Create a WhatsApp Business account. Then click Next.
A WhatsApp Business Account (WABA) is the WhatsApp-specific container that lives inside your Business portfolio.
Enter your business information
Fill in every field — Name, Email, Category, Country, and Website (the website URL is required). Don't skip anything, then click Next.
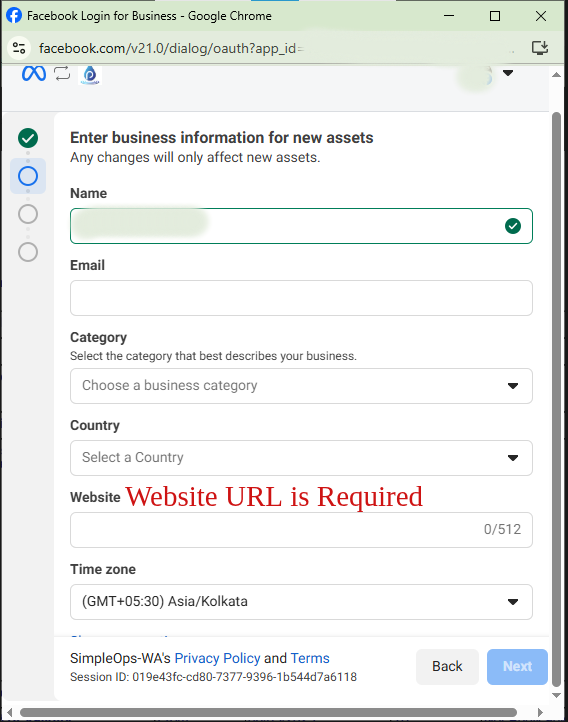
Why this matters: incomplete business info is the #1 cause of Meta restricting your WhatsApp account later — and unrestricting it takes days.
Business name rules — read this carefully
A valid name shows a green ✓ next to the field. The same rules apply to your display name in the next step.
Allowed
- Proper business-style name —
My Milk Cart - First letter capitalised, natural capitalisation
- Same name as on your GST / registration, if possible
Will be rejected
- ALL CAPS —
MY MILK CART - all lowercase —
my milk cart - Hyphenated / symbols —
my-milk-cart - Generic phrases —
Online Store - Emojis, symbols, ™ marks
Maximise approval: use a real registered business name with proper capitalisation, and match your GST / registration document. When the name is valid you'll see a green ✓ next to it.
Add your phone number, display name & verify
Enter your phone number with country code (e.g. IN +91 9876543210) and your WhatsApp Business display name — what customers will see (follow the same naming rules as above). Choose Text message or Phone call, enter the verification code Meta sends, then click Next.
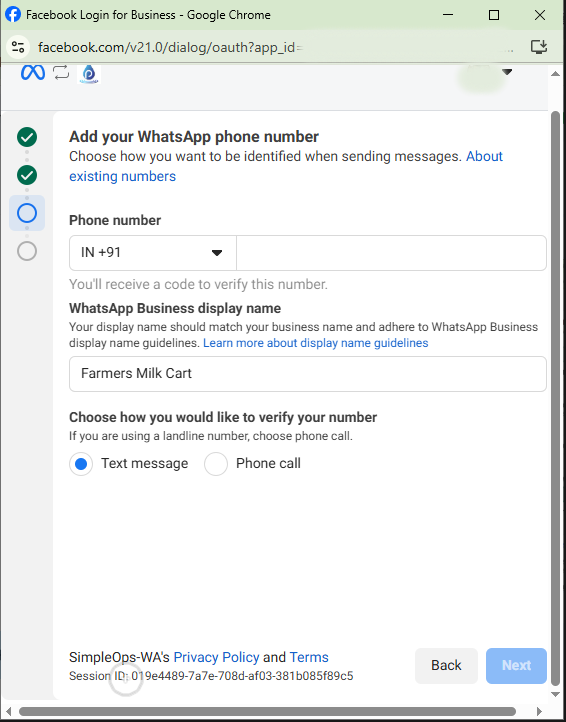
The number must not be in use on any WhatsApp app (regular WhatsApp or WhatsApp Business). If it is, delete that WhatsApp account first (WhatsApp → Settings → Account → Delete my account, then wait ~5 minutes) — or simply use a fresh number.
Review and confirm
Meta shows a summary of what you'll share with MessageBhejo. Press Confirm and hold for a few seconds while it processes.
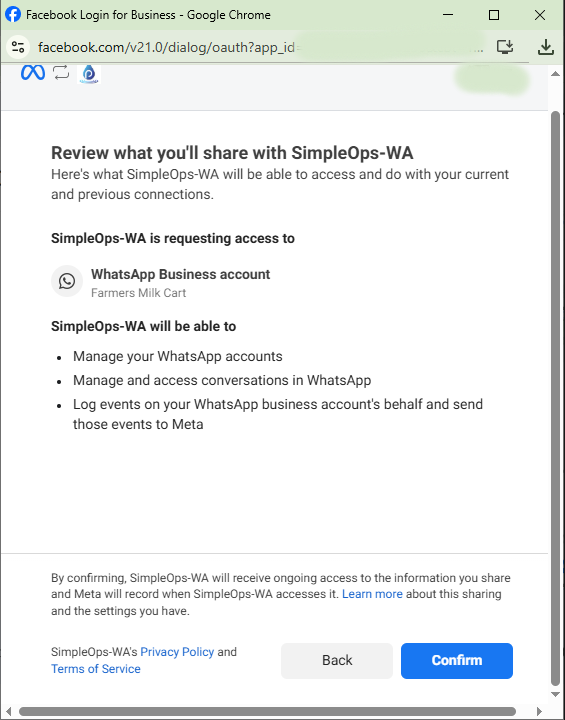
Finish
When you see "Your account is connected", click Finish.
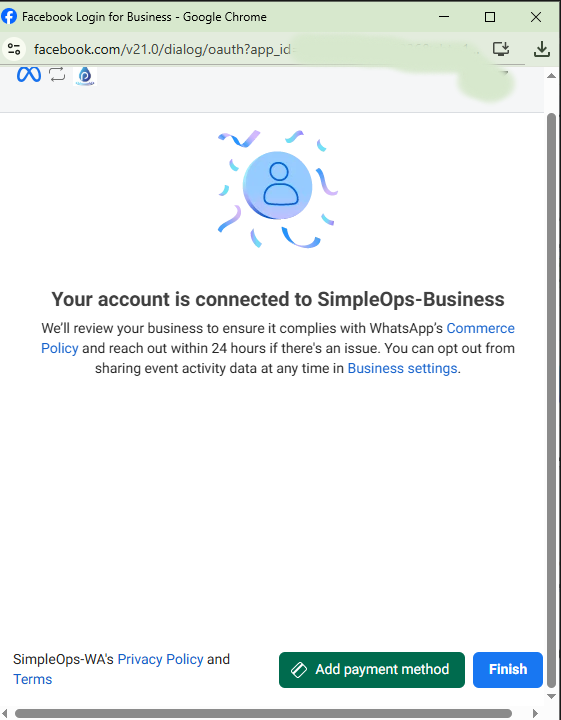
You may also see an Add payment method option here — you can add your card now, or do it in Phase 4. Either works.
Back in MessageBhejo — connected
The popup closes and MessageBhejo confirms Account is connected. Your WhatsApp connection is now live. 🎉
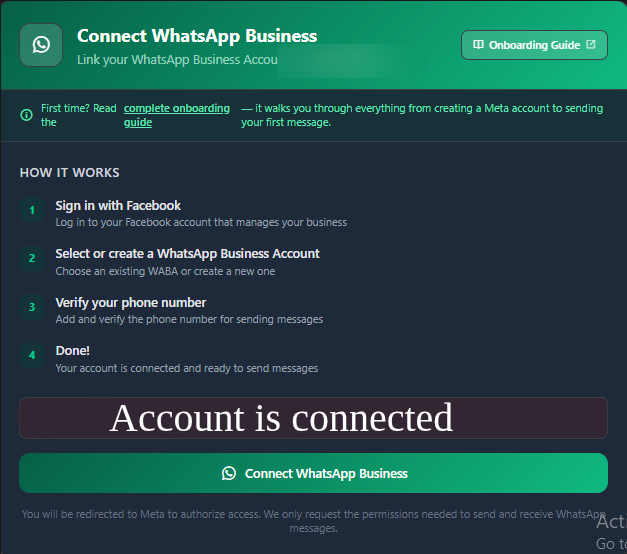
Two more things must finish on Meta's side — business verification and billing. That's Phase 4.
Verify your business & set up billing on Meta
Done in Meta's Business settings — a few clicks plus a background review.
Why this matters: business verification unlocks higher messaging limits, and a payment method is required before Meta will deliver your paid messages. Start the verification first — it runs in the background while you finish the rest.
Open Business settings and select your business
Go to business.facebook.com. In the top-left, make sure your business is selected — if not, click the selector and choose it.
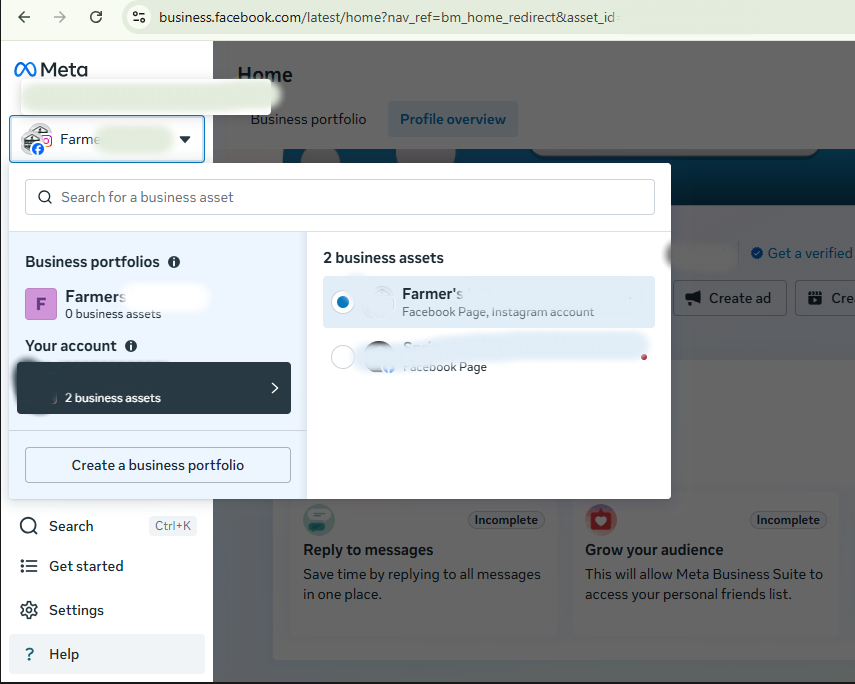
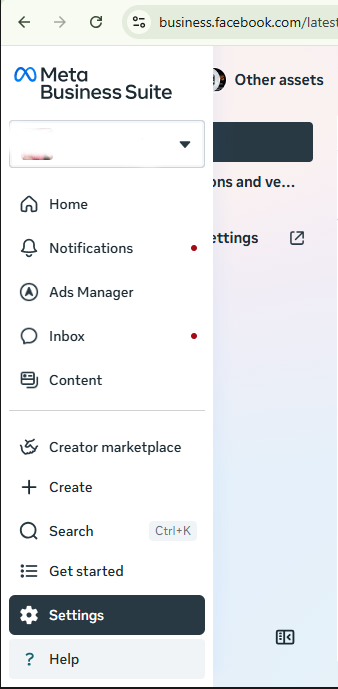
Go to Settings → Business info
Open Settings from the menu.
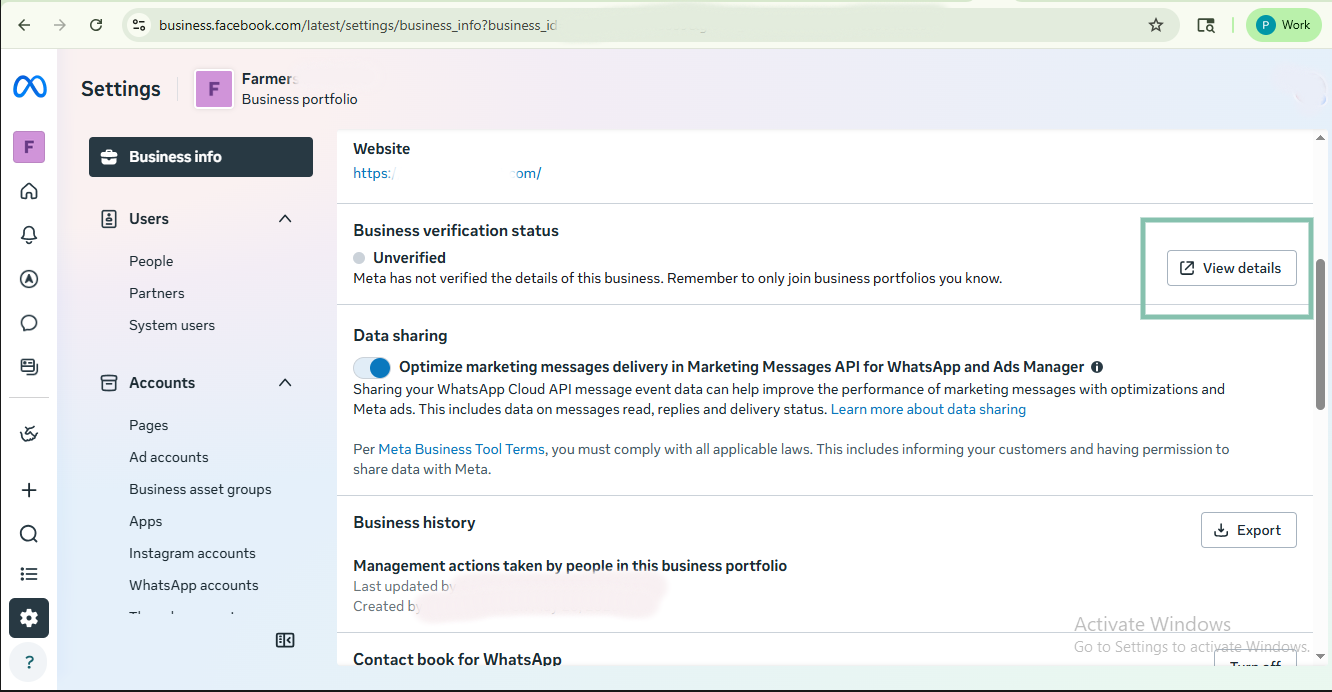
Open Business info (next to the left menu). Scroll to Business verification status — if it says Unverified, click View details.
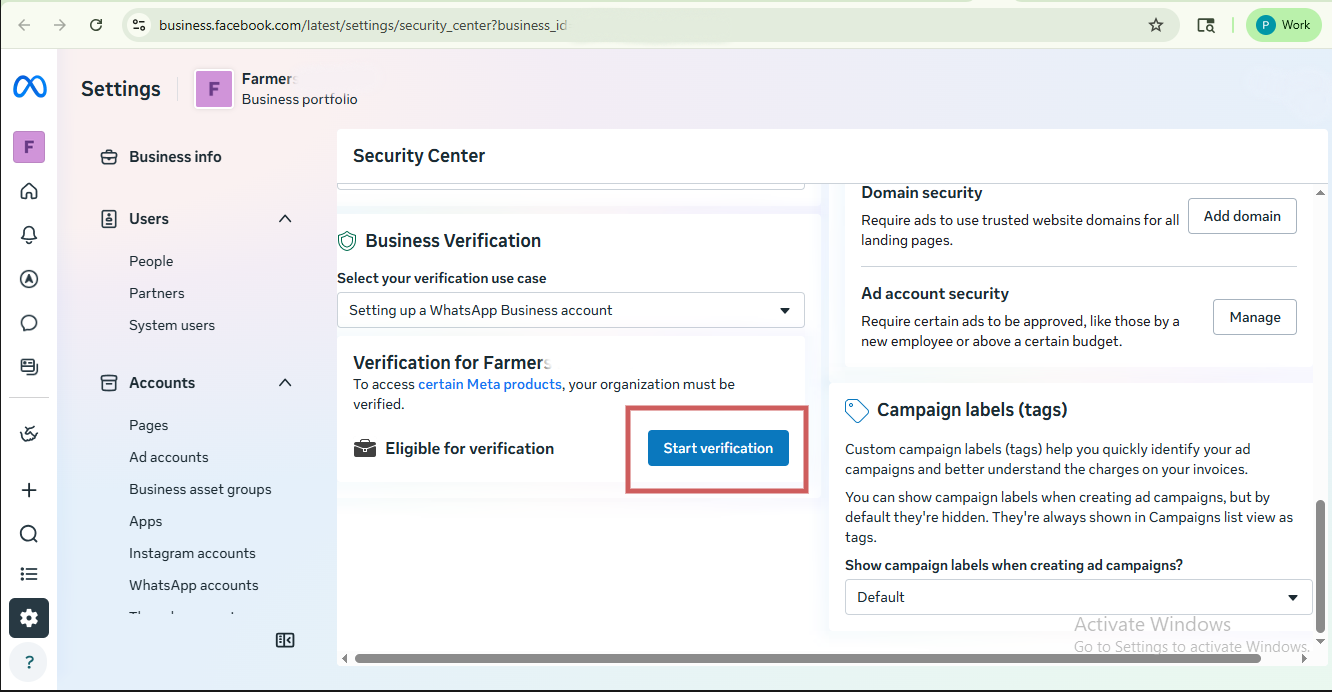
Start business verification
On the Security Center page, scroll to Business Verification and click Start verification.
Then click Get started.
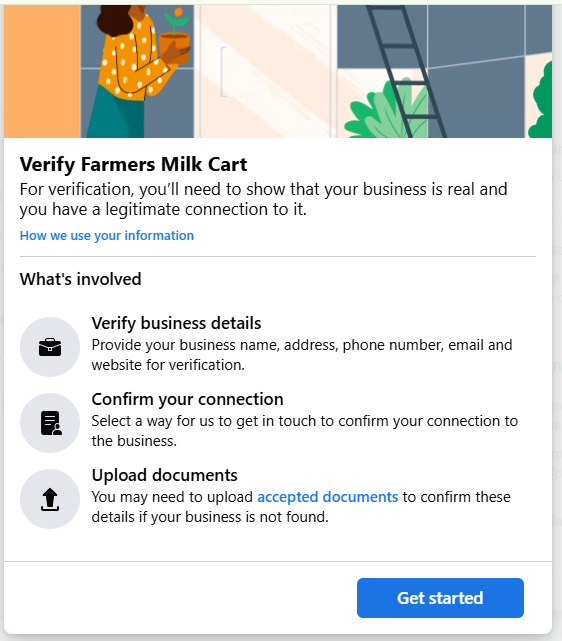
Check Meta's accepted-document requirements before you start, so you have the right files ready (registration certificate, recent utility bill or bank statement, etc.).
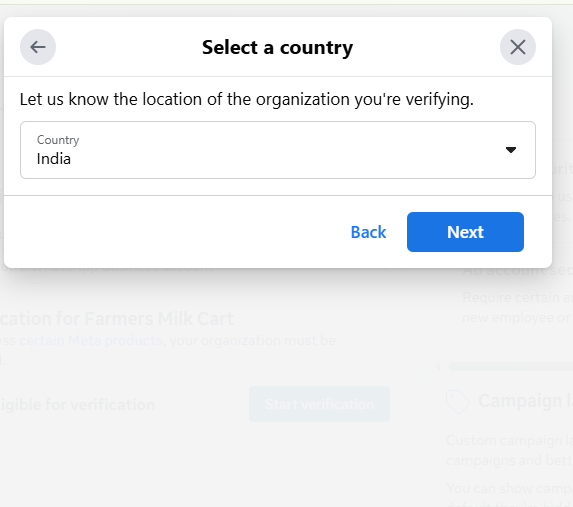
Choose country and business type
Select your country and click Next.
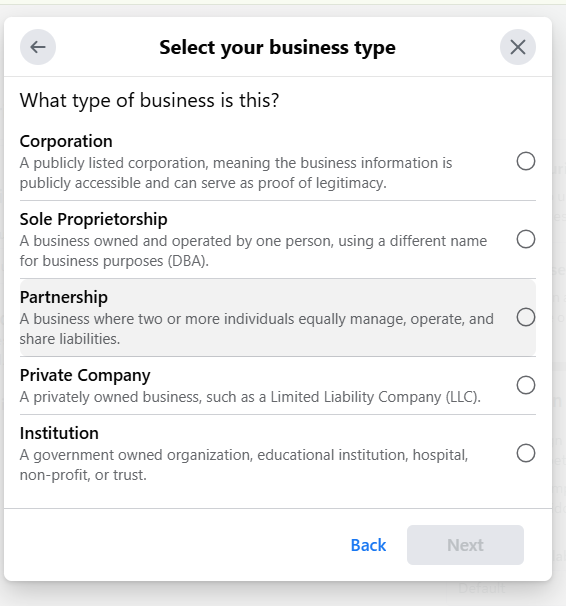
Choose your business type and complete the forms Meta provides. After you submit, the verification status changes to In-Review.
Timeline: most decisions arrive in 1–3 business days; Meta allows up to 14.
Verify your tax info
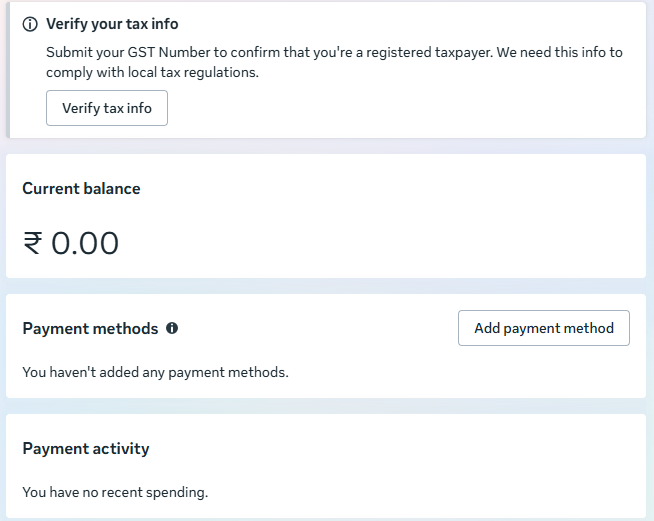
Open the Billing hub. Click Verify your tax info, then See more.
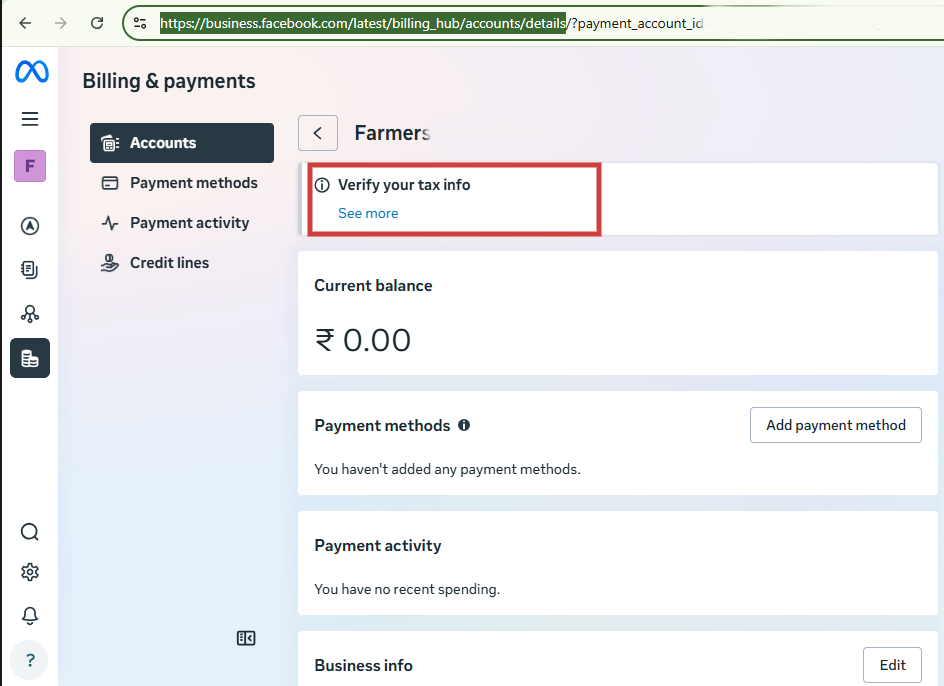
Click the Verify tax info button to open the popup.
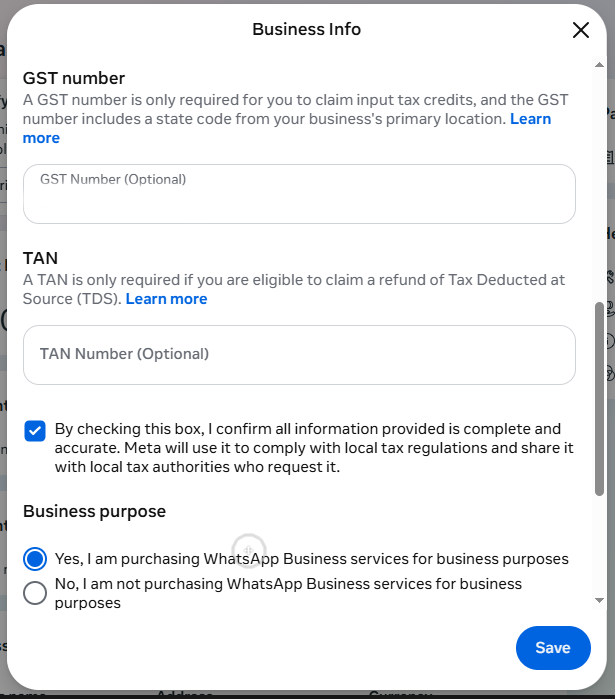
Enter your GST number (optional, but recommended if you're a registered taxpayer) and TAN (optional), tick the confirmation box, choose your business purpose, then click Save.
Add a payment method
Back in the Billing hub, under Payment methods click Add payment method and enter your card.
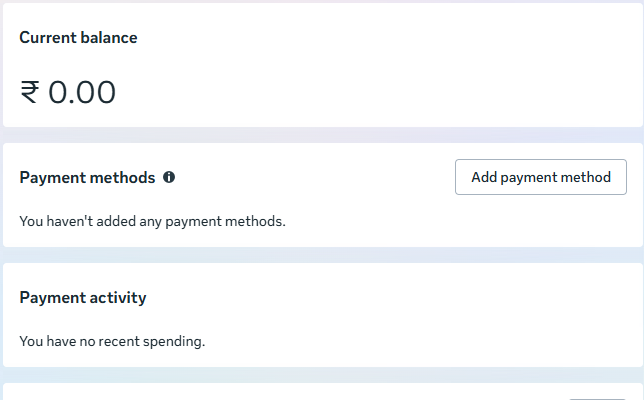
Without a payment method your messages will not be delivered. Pricing varies by country — see Meta's WhatsApp pricing.
Get your display name approved & set your profile
The display name you entered in Phase 3 is what customers see in WhatsApp. It goes through a separate Meta review:
- Typical: 5 minutes to 3 hours · Maximum: ~48 hours
- No email — check your WABA's Phone Numbers tab for an Approved status
- If rejected, edit it so it matches your business with natural capitalisation and no symbols (see the naming rules in Phase 3)
Finally, set your public profile in MessageBhejo under Account Settings → WhatsApp Business Profile — profile photo, About text, description, address, email, and website. This is what customers see when they open your business in WhatsApp.
Send your first message
You're fully connected. Time to actually use it.
Add contacts
In MessageBhejo: Contacts → Add Contact for one customer, or Contacts → Import to upload a CSV.
Easiest path: let a customer message you first
Once a customer messages you, you have a 24-hour service window in which you can reply with any kind of message — no template needed. Tell your first test customer to send a message to your business WhatsApp number.
To message first: use an approved template
To start a conversation yourself, use an approved template. Templates are pre-written messages with placeholders that Meta reviews ahead of time.
- Templates → Sync from Meta (pulls any default templates).
- Templates → New template — choose category (Marketing / Utility / Authentication), write the body with
{{1}}variables, submit. - Wait a few minutes to a few hours for approval.
- Chats → New conversation → pick template → fill variables → send.
order_confirmation
Utility · English
welcome_offer
Marketing · English
delivery_update
Utility · English
Watch your quality rating
The Dashboard shows your quality rating (Green / Yellow / Red) and messaging tier. Keep these healthy:
Green
Customers aren't blocking you. Keep sending.
Yellow
Reduce volume; review message content.
Red
Many recipients reporting. Stop marketing for 24–48h.
Tier progression: 250 daily conversations (default) → 1K → 10K → 100K → Unlimited. Higher tiers require business verification + sustained good quality.
You're fully onboarded.
Welcome to WhatsApp Business with MessageBhejo.
Troubleshooting
The 7 most common stumbles, with fixes.
!
Phone number "already registered on WhatsApp"
You tried to use a number that has WhatsApp on it.
- On that phone, open WhatsApp → Settings → Account → Delete my account.
- Wait 5–10 minutes.
- Retry the embedded signup.
!
Verification code never arrives
- Wait 60 seconds, click Resend.
- Switch from SMS to voice (or vice versa).
- Check phone signal and Do Not Disturb.
- Verify country code (+91, not 091).
- Wait 5 minutes — telecom routing delays.
- Try again 1 hour later if all 3 attempts fail.
!
"We can't onboard you right now" / 7-day limit error
Our Tech Provider quota is full for the moment (10 customers per 7 days by default). Wait 24 hours and try again, or email support — we can sometimes prioritise.
!
Display name rejected
From Business Manager → WABA → Settings → Phone Numbers → Edit Display Name. Use a name that:
- Matches your business registration document
- Appears in your website footer
- Has natural capitalisation
- Has no symbols, emojis, or trademark marks
Limited appeals — get it right or you may be locked for 7–60 days.
!
Business verification rejected
Meta tells you which document or field was the problem. Common fixes:
- Re-upload a clearer photo
- Use a document under 12 months old
- Make legal name match exactly
- Use a utility bill matching your entered address
No penalty for resubmitting; each cycle takes 1–3 business days.
!
WABA was restricted right after onboarding
Almost always caused by incomplete Business Info. Meta requires legal name, address, website, business phone, business email — all filled in.
Fix: Business Manager → Business Settings → Business Info → fill every field → save. Restriction usually lifts within 1 hour.
!
"Setup failed: Failed to exchange code"
Internal error during the popup-to-server handoff. Usually caused by closing the popup too early.
Fix: Refresh the MessageBhejo page, click Connect WhatsApp Business again, and let the popup close itself this time.
Frequently asked questions
Why am I paying Meta directly instead of through MessageBhejo?
Can I switch to a different provider later?
I run multiple businesses — do I need separate logins?
Will my customers see "via MessageBhejo"?
How long from signup to first paid message?
What happens if I already use the WhatsApp Business app on the same number?
Ready to connect?
Sign up free, then walk through this guide alongside the app. We're here if you get stuck.
Useful Meta links: Platform overview · Display name guidelines · Verify your business · Pricing